Sunnyside Comics

Sunnyside Comics

Since 2007 a dedicated group of kids have been meeting up every Friday afternoon in the science lab of Sunnyside Environmental School composing their own graphic novels, comics, manga and illustrated narratives.  Young creators from kindergarten to 8th grade from several neighborhood schools have participated with an equal number of boys and girls dishing out […]

Beer Crafts

Beer Crafts

Described as “ingenious”  by the Denver Post- Beer Crafts is a synthesis of two outstanding hobbies — making things and drinking — and  the answer to the age-old question of what to do with those 99 bottles of beer on the wall. Beer Crafts is a DIY guide for how to repurpose not just the caps but also labels, […]

Beer Can Bunting

beer can bunting tutorial www.beer-crafts.com

If you've been anywhere near Pintarest lately or perused a craft magazine you'd know the world is positively festooned with colorful bunting, long streamers and cute decorative pennants and flags. Inexpensive to make and high on the "wow" factor,  paper garlands are popping up everywhere, and like so many other great projects, I knew I needed to put a Beer Crafts spin on them.

beer can bunting at the New Belgium brewery in Ft. Collins

My bunting is designed a super simple crochet pattern, the same that fab fiber artist Bekki Scotto used for making the hats in the Beer Crafts book, and in terms of party decor it's as cheap as it comes- empty beer cans and yarn from my stash.  The only supplies you'll need are pair of scissors, hole punch and a crochet needle.  A six pack (or two) later and your back porch is gonna look styilin- Best part about this craft, aside from the tasty beers you'll try on your way to making it... is it's portability, the banners pack small and if you're using a forgiving yarn, you can leave them out overnight.  I've had a blast this summer traveling to some outstanding bookstores and breweries and my bunting has decorated all the festivities getting just a little bit longer with each stop.

This Saturday, August 24th  I'll land in Cincinnati for even more crafty fun at the Christian Moerline Tap Room, and  Cincinnati Arts Center and Arnold's Bar on the 26th, you'll know me when you see me, I'll be the girl with a beer in one hand and bunting in the other- and say, beer can bunting looks perfect for yarn bombing... maybe some of my extra fun Cincy pals will want to join in that fun too!  Looking forward to crafting it up with some fine local beers- I know there will be some MadTree Brewing cans getting added to the chain for sure.

Beer Can Bunting DIY tutorial #shasta #vintagetrailer www.beer-crafts.com

Below are my directions for making bunting and if you're ANYWHERE near Humbolt county this Wed. you absolutely must go meet Bekki and the kids at SCRAP- they'll be having a fab evening of making, and of course THERE WILL BE BEER.

If you're new to crochet there are some pretty great tutorials on youtube this one has a whole bunch of stitches in one video

Supplies:

can opener

size H (5mm) crochet hook

paper hole punch

scissors

one skein worsted weight yarn or medium weight scrap yarn from stash

beer can

How to: 

1. Crack open your favorite can of beer and empty it (my favorite method for this is pouring it into my mouth). Rinse can with water and let dry.

2.  Pry off pull tab and save for another craft project

3. Using a can opener on the OUTSIDE of your lid remove the top to your can.

how to cut a can for bunting www.beer-crafts.com

4. With your scissors cut down the length of your can through the UPC label area

5. Cut your can horizontally to remove the bottom and trim off top beveled rim of can too so you are left with a flat panel, this is your flag- many beers have two images on the can and you can cut this in half or maybe you want a long wide flag... I've also cut some into long triangle pennant shapes, there's no wrong way to shape this.  You will want to round all your corners off slightly so the edges don't poke through your crochet work

6. With your hole punch make holes around your can about 1/4 inch from the edge, make sure you have holes in each corner and spread the rest in between about an inch apart.

7. Using your crochet hook sl st into your top right corner hole of can panel and ch3 (counts as 1 dc), dc 2 into the same hole, dc into the next hole and all following holes until you get to the next corner, dc 5 into the left corner and repeat your work around the can, working 3 dc into holes along straight edge and 5 dc into corners until you arrive back at the start.  Work 2 more dc into the starting corner, sl st into the second ch of the ch 3 and tie off.

8. Make as many of the flags as you'd like, go nuts, use up all your old yarn, go try some fancy new beers, you'll probably want about a dozen flags to kick this off, but it's really up to you

9. To connect the flags you'll be making a big long crochet chain- you can work these in a larger needle if you'd like and even even work on a bulkier yarn. I wanted to make sure I had a nice long tail to tie each end off with so I chain stitched about 18 inches then worked my chain across the top stitches of the flags spacing the flags about 18 inches apart.  I knew I wanted to make my flags cover some big distance so they are fairly well spaced, they'd look pretty darn cute if you spaced them closer together too.

I'd love to see how your bunting comes out, send pics and I'll post them on the blog.

Party Time with Beer Crafts

Beer Crafts bling www.beer-crafts.com

Holy smokes the Beer Crafts summer tour is just about to happen, the family and I are packing up the vintage 1963 Shasta travel trailer, lots of craft supplies and a few special beers to share with friends.  Our route will have us following the Oregon Trail, but backward and making lots of stops at breweries and pubs along the way, checking out the local flavor. Once we hit Colorado there will be some major crafting getting thrown down with the first stop being an epic progressive pub crawl and night of making with the Denver Craft Ninjas. These good time gals get together once a month and make fab projects like seed bombs, tea towels, and my forever favorite- sugar skulls .Yes, these are my kind of people especially since they do their meet ups in bars!

While crafting in pubs sounds ideal, combining our two favorite things- there are a couple things I try keep in mind... can the project be completed in a short period of time?  I'm a notorious starter, nothing is more fun than jumping into a new thing, but I also relish the sweet victory of completion, for a night out crafting, I look for easy things to make which craft up quick like tiaras and bracelets.

Is it KISS? K eep I t S imple S tupid ?  For me, bar crafting involves not too many tools and accessories, Crafting for and with a crowd is easiest if there isn't too much equipment involved, that said, I really do travel with a dozen glue guns and multiple sets of scissors, even to the bank. I also check ahead with my bar friends about glitter, some folks have a bizarre aversion to it, personally I'm down with extra sparkle any time but there is a weird stigma there so I try to show some respect.

a crafty tiara www.beer-crafts.com

Another thing I like to think about with group craft projects is the fun factor, is there room for self expression, are friends going to learn a new skill that they'll share and do other things with, is it going to be cool for novice crafters and old pros?  Finding a balance can be tricky but my favorite nights are the ones where I'm getting schooled by my friends, they've taken a whole new approach to the supplies and made something I'd never even envisioned. There is also something fab about making things as a group, either a larger piece to share or a craft to gift or trade.  These evenings and afternoons aren't always about the end result, but really the process- hanging out with friends, making new awesome people and enjoying ourselves.  I'm so, SO looking forward to this journey and of course all the great beers we'll be sampling along the way.

For a complete list of Colorado events in July, check out the link here or my events page and this great article written by Denver Post blogger Josie Klemaier .  And to give you just a taster of what a Beer Crafts event feels like- I've enclosed some of my favorite pics from the book launch party.

Shawn Bowman with book photographers Laura Sams and Rob Sams
Brandy's Tiara www.beer-crafts.com
kids craft too www.beer-crafts.com
www.beer-crafts.com
www.beer-crafts.com
There were exotic snacks
My friends rocked the craft table

Make a Father's Day Beer Trophy

Beer Can Trophy www.beer-crafts.com

Three cheers for the guy who brought you into this world.  Raise a can to salute the man who taught you all about belching, belly scratching and the importance of keeping a couple frosty ones in the fridge.  Is there any better way to salute a guy than with an awesome trophy of his favorite brand? I think not! Beer can awards are ridiculously easy to make- you'll need an old trophy, get that at the thrift store, don't use one of his, that might not go over too well! You'll also need 2-3 empty cans or a six pack if you're making an epic tower and glue sticks and a glue gun. You might look too for extra parts to embellish the trophy.  A small urn turned upside-down makes a great pedestal and  tiny beer cans from doll house sets look good in trophy statue hands.  I like to combine parts from different trophies to get extra height and bling.

To Make:

Step One: Open a beer, Dad's favorite brand.  My pop drinks Heineken, so I decided to make him a trophy using Iron City instead because the can was pretty freakin cool. I washed out the can after I finished it off and set it upside down to dry, afterward I pried off the pull tab using my fingers.

Step Two: Deconstruct the trophy.  There is probably a small nut at the base which needs to be unscrewed.  The nut is most likely attached to a rod that goes through the entire trophy.  Pull this out and save it for another project then go ahead and take the other pieces apart.

Hipster Trophy details

Step Three:  Re-assemble trophy.  Another easy peasy thing, find the parts you like best and stack them up gluing each layer with a glue gun.  This is the fastest method for putting it together but not super durable so you'll want to be careful carrying it around.  You can try another glue for stronger bond, like Gorilla Glue, and you can fill your cans with sand to make them more stable BUT your trophy will get super heavy that way and can make a huge mess if it comes apart- Personally I stick just with the glue gun but there is lots of room for experimentation with this craft.

You can add caps to this too or go all out and have a fresh engraving made for the base letting dad know he's #1 in your book!

Pin One On

Magic Hat Pincushion www.beer-crafts.com

With Mother's Day just around the corner, I wanted to put up an easy and fun gift tutorial from my new book which is entirely practical and features Mom's favorite beer. If your mom is anything like me, there are probably a couple cool looking cans sitting in her recycling bin right now just waiting to be upcycled.  If not, you should go pick up her brand of choice and pour her a cold one.  You could drink this beer yourself, but remember, this is the woman who gave you life, carried you around for nine month, wiped your runny nose, made sure you were wearing sensible shoes and gave you your good looks.  Seriously, you should buy her a beer.

Once you've drained the can, it's time to get crafting. The following are a list of supplies you'll need to complete the craft:

Supplies:

Beer can

Can opener

1 cup small rocks

Small amount stuffing or fiberfill (enough to fill the can, plus a generous handful)

Scissors

8 x 8-inch piece of fabric

Hot glue gun

12 inches of any width grosgrain ribbon, for trim

Rickrack, buttons, or sequins for embellishing

How To:

Open up the can of beer and drain it quickly.

Pry off pull tab and save for another project

Use the can opener to remove the top from the can. Rinse and dry the can, being mindful of the cut edges.

Fill the can about halfway with small rocks.

Fill the remainder of the can with stuffing, leaving about 2 inches of stuffing coming out of the top of the can. Set aside an extra handful of stuffing for the last step.

Cut a 7-inch circle from the fabric.

Cut 1/2-inch slits in fabric every inch all the way around the fabric circle.

Hot glue the edge of the fabric to the outside of the can. The slits you cut will help ease the fabric tension, but you’ll also want to let the fabric fold onto itself in creases as you glue it down.

stuffing a beer can pincushion www.beer-crafts.com

When you get halfway around the can, insert the rest of the stuffing.

Finish gluing the fabric around the can.

Put a bead of hot glue around the seam where the fabric meets the can, then place the ribbon on top of the glue beads.

Embellish the pincushion ribbon with rickrack, buttons, or sequins

For 39 other cool crafts like this, check out my new book Beer Crafts available now for pre-order and on the shelves May 14th.

Book Launch Party

sun hat
sun hat

Wow- after over a year of hard work and lots and lots of beer the book is a done deal and ready to hit the shelves .  I couldn't be more stoked and can't wait to celebrate with the friends who helped make it happen.  Laura and Rob Sams did an amazing job with the photography and the folks at Andrews McMeel hit the ball out of the park with awesome design, layout, editing and the million other things it takes to make a book happen.  Matt Newell came up with the patterns and a great website. I think it's fair to say we've blazed a new trail in craft publications, a unique path that leads from the fridge to the craft room, along the way we sampled some kick ass beer.  So come join me in toasting the best in sustainable crafting the one that "involves you to open a beer" as my daughter might say.  We're partying down at The Beer Bunker on May 18th 2pm. 7918 Stark St. in Portland.  I'll be bringing some snacks and a whole lot of craft supplies and there will be a limited supply of tasting trays too.

A Stout Idea

Guinness cupcakes from beer-crafts.com

My first experience baking with beer was in 1996 when I was the pastry cook at Q's  restaurant  in Boulder Colorado.  This was early days in the craft beer revolution and folks were just beginning to experiment with beer styles and production, the idea of adding beer to food, beyond boiled beans and steamed clams, wasn't that common.  I made a German chocolate stout cake with porter cream cheese frosting and it was pretty darn good.  The cake was a little on the dense side but super, super moist and paired beautifully with the chocolate, as you might expect. For St. Patrick's Day this year I wanted to revisit the recipe, and made a few changes.  Rather than using a typical sour cream in the mix I used Mexican crema, it has a slightly sweeter flavor and whips lighter into the batter.

I also went with an Amaretto butter cream which was a sweet compliment to the warm barley taste of the cupcake.  There are a number of great recipes for this frosting, and I especially like this one on the blog Life Tastes Good.

Since I'm all about re-purposing my empties, I was eager to productively use the cans which went into making the desserts.  Easy peasy.  If you've never deconstructed a can before, it's pretty simple once you learn the tricks.  Some folks will use heavy gloves and tin snips, but I find that totally over the top, once you get the lid off, cans cut like butter.  I've got a pair of old scissors I use for all my can trimming and I always make sure to trash my scraps since the smaller bits might hurt if you stepped on them.

cupcake liners by beer-crafts.com

Step one:

Open a beer and find a good receptacle  for the contents.  This is usually my mouth, but this time you'll need the beer for the batter, so you should set it aside for baking time.

Rinse your can and let it dry upside down.

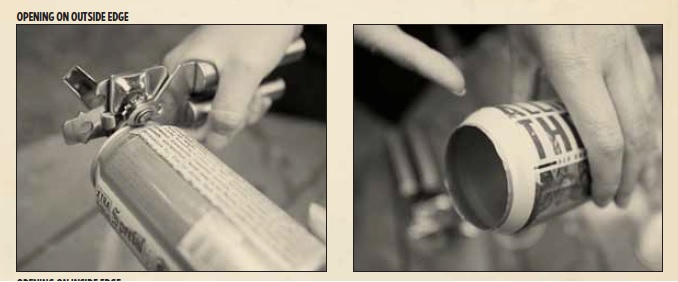
With a can opener on the OUTSIDE of your can, remove the top lid.  Save your pull tab for another fantastic craft project.

Step two:

With scissors make a vertical cut straight down your can to the very bottom.  Having this slit will help you get the cupcake back out out of the can when it's eatin time.
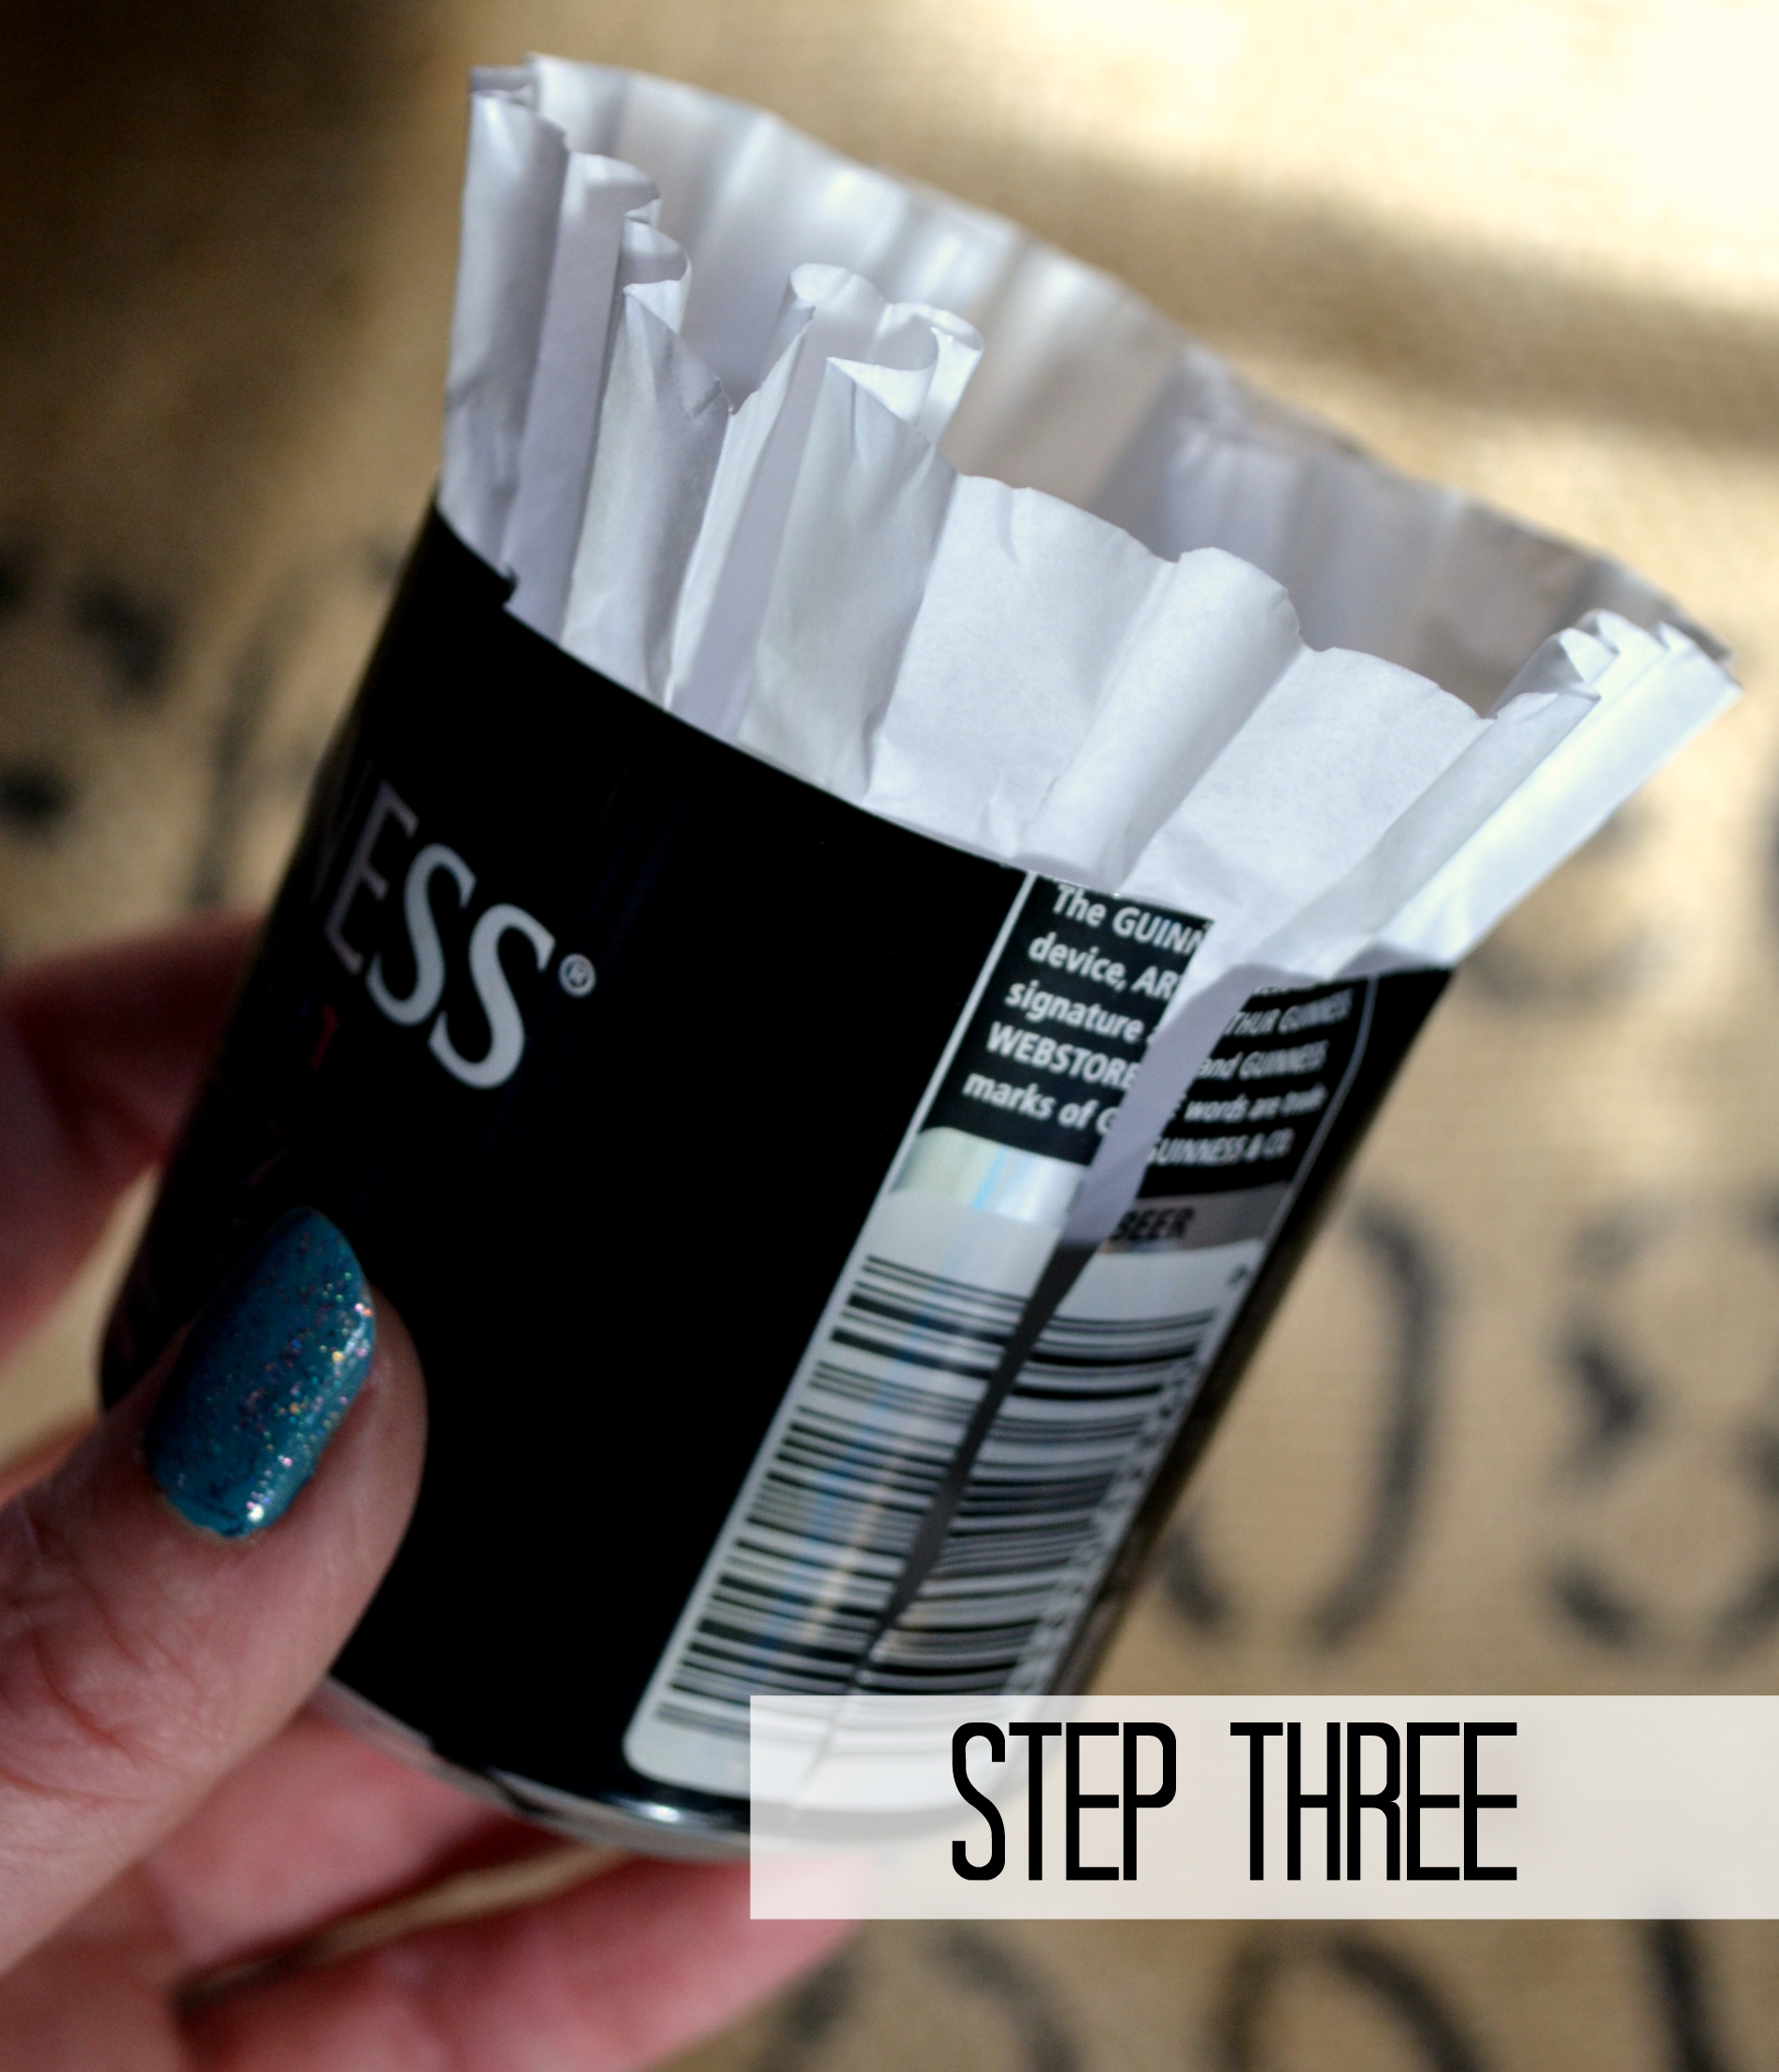
Step three:

Cut a horizontal line around the can just above the word Guinness and place a paper cupcake liner inside.  Make your batter and pour all the way to the top of the paper liners, put into oven and bake according to the recipe.  While the cupcakes are cooking you can make the frosting and toppers.  This step was pretty simple too, I trimmed the harp shape from the top part of the beer can and put a daub of hot glue on the back attaching it to a bamboo skewer.

Put on your favorite Pogues album and enjoy your treats- Happy St. Pats!

Guinness Stout Cupcakes

1 can Guiness

1/2 cup milk

1/2 cup vegetable oil

1 tablespoon pure vanilla extract

3 large eggs 3/4 mexican crema (can substitute with sour cream)

3/4 cup unsweetened cocoa powder 

2 cups sugar

2 1/2 cups all-purpose flour

1 1/2 teaspoons baking soda

1. Preheat the oven to 350°F. Spray paper liners with nonstick cooking spray.

2. In a large mixing bowl, combine the stout, milk, vegetable oil, and vanilla.

3. Beat in the eggs, one at a time until thoroughly incorporated. Add in the crema and mix until combined.

4. In a large mixing bowl, whisk together the cocoa, sugar, flour, and baking soda. Gradually mix the dry ingredients into beer mix. Your batter might look thin but the eggs will make it rise nicely, no worries!

5. Bake for 18-22 minutes, until risen and center is cooked.  Cool on wire rack completely before frosting

Colorado Reconnaissance Mission

Flight of Fab from Rengade

Last week was a big mile stone, my beloved step-dad, Bob turned 70 and I used the occasion to sneak off to Colorado for a family celebration AND to lay the groundwork for an awesome Beer Craft summer tour.

The beer scene in the west is mindbogglingly huge, in four days I was barely able to visit a fraction of the breweries on my "must see" list. Each of the places I manged to squeeze in was unique with own cool vibe and the beers were pretty kick ass.  The craft scene in Denver has exploded too and I manged to find a couple great spots to shop within walking distance of the breweries and at Fancy Tiger Crafts, a needle felted lamb kit I couldn't live without.  Damn if this city isn't Beer Crafter utopia.

Hutch and Spoon
Hutch and Spoon

Day one of my trip had me lunching at Breckenridge Brewery a Denver institution since 1992, I sampled a Christmas Ale which perfectly off set my lamb strip spinach salad.  For happy hour I met up with a friend at Renegade Brewing in the Santa Fe Arts District. Of all the beers we sampled the Sunday Morning coffee infused strong ale was my favorite, super crisp and light, the kind of flavors normally blended with a stout worked refreshingly well in this lighter bodied beer.  Tucked in between the galleries, around the corner from Renegade is the delightful sewing studio and knit lounge, Fabric Bliss where I stocked up on a couple skeins of chunky yarn. Further down Santa Fe is Stranahan's Whiskey Bar which along with being a killer distillery had an amazing selection of local beers.  I wound up the evening helping pour wine at Hutch and Spoon.  Usually open for breakfast and lunch, the cafe was hosting an evening art opening. Owner  Tracy Zimmer and I have been friends since grade school and it was a hoot to hang out with him behind the counter swapping stories during the reception.  If you find yourself on Larimer St.  it's definitely worth a stop with a decent wine and beer selection and arguably the best grilled cheese sandwiches in the Rockies.

Banjo Billy
Banjo Billy

I took Saturday off from crazy adventures for a little family time and last minute birthday crafting, though we did managed to sneak off to Apple Jack Liquors for emergency beer supplies and wow, what a treat huge selection of local and imported beers, lots and lots to choose from.  If you like to preview the beers before you head over, check out their website, great catalog of what's in stock.

For Bob's birthday on Sunday we headed over to Pints Pub where we met up with his car club cronies for lunch before a tour around Denver on Banjo Billy's bus.  Looking like something straight out of the Beverly Hillbillies, the bus offers historical and beer trips around Denver and Boulder.  They've taken out many of the old seats and added couches arm chairs and even a saddle, lined with tapestries and Christmas lights, the bus feels like a comfy cabin hide-away on wheels and was the perfect way to travel around town with 25 of your favorite friends.

Small Selection of Single Malts at Pints Pub

Since we'd booked the bus for a private tour we were able to bring snacks and beer along too, which just added to the merriment.  We ended up back at Pints which has the largest single malt and whiskey selection outside the UK and lovely, lovely cask conditioned ales which they brew on the premises.

Barrel Aging at Avery

After sleeping in on Monday, I was back in research mode, though this time a bit north of Denver to see what trouble we could get into further up the range.  !st stop was Avery Brewing.  Making great beer since 1993, Avery is a must stop for any brew tourist, I highly recommend Ellie's Brown Ale and the 3 Point 7 Milk Stout.  Things are pretty exciting at Avery these days, they've just purchased 5.6 acres of land north of Boulder and will be opening  a new brewery in 2014.

For lunch we moseyed over to Boulder Beer Company this was a cool homecoming for me, this was the first craft beer I'd tried, way back in1991 when I waited tables at Walnut Brewery and we served the Buffalo Gold.

Solar Powered Electric Bikes

A couple things I love about this brewery, aside from the great beers and lentil soup, they've got a set of community tools to work on your bike right outside the front door and if you've left your bike behind completely, you can rent a solar powered electric one.  Super efficient and green friendly, plus the roomy basket in front has space for a growler and all your craft supplies.

The last two stops on our adventure were at Oskar Blues, both the original brewery up in Lyons and the much larger Tasty Weasel location in Longmont.  Wow, wow, wow, great beers, super nice folks, good vibes and so cool to see how craft beer can be made with care in a big facility.  Our tour guide Rudy was super friendly and knowledgeable giving us a great run down on how the different beers get made.  I was super impressed by the tower of cans waiting to go out to distribution, all that delicious craft potential, it staggers the mind.

My folks and I wound the evening down at Yak and Yeti in Arvada.  This   Indian Nepalese restaurant and brewpub is to die for, I absolutely love the food garlic cheese naan, chicken masala and this amazing carrot custard for dessert- but what makes this place stand out is the fabulous beers they are making on site to match the menu, unbelievable, Jalapeno Ale, Chai Cream Stout, Himalayan IPA, these guys know how to rock it, the staff is all super sweet.  If you get the chance catch them on the weekend for the all you can eat buffet, a gut bursting value.

Knitting Lounge at the Airport

After four days of royal and debaucherous treatment it was time to head home and Denver had one last surprise for me.  On the skyway bridge between the central terminal and "A" concourse, the Denver Handmade Alliance has on display featured craft pieces from artists around the city.  Along with the lovely exhibits was a knitting and crochet lounge where craft addicts can chill between flights and hook a few stitches.  Such a welcoming space, I couldn't help but add a couple rows and curse that fact that my plane was actually on time.  Oh Denver, you've been good to me!

Out of hibernation

xmas-beer-768x1024
xmas-beer-768x1024

Baby its cold outside, and when we’re talking about chilled frosty ones- I’d like to be thinking about the beer in my glass and not the six inches of ice gluing the wipers to the windshield of my car.

Like any civilized mammal, I hunker down and hibernate when the days start getting shorter.  A few things will draw me out of the craft cave though like the need for food, toilet paper and the siren’s call of beefy holiday beers and winter stouts that roll out at my favorite bars this time of year.

Foraging for sustenance at my neighborhood bodega, I was rewarded with a huge selection of cool new winter cans.  I couldn’t resist picking up a Hopwork’s Abominable Winter Ale, weighing in at a bombastic 10.4% , this beer has a rich caramel flavor and crisp finish giving it an “exceptional” title from Beer Advocate and outstanding rating of 92.  I’d order it no matter what the packaging, but the darling yet ferocious yeti stole my crafter’s heart.

Faster than you can say “Jack Frost” I’d poked  holes in my cans, made them cute-as-a-button hats and stuffed them with bird seed for the little starlings who live in my back yard.  The yeti feeders were a true feast for the eyes and he birds were beyond delighted with their easy buffet.  I went to bed that night with a warm heart, knowing that once again our lives had been greatly improved by an awesome beer.

Steampunk Crafting on a Shoestring

steampunk-craft-room.jpg
Steampunk pin www.twobeerindustries.com

Steampunk pin www.twobeerindustries.com

During the winter of 2013 I hosted a series of Steampunk inspired workshops for the Multnomah County Library system visiting several branches.  Youth and adult participants made metal "Admiral Pins" from recycled cans, paper elements and mechanical ephemera.

A second project was available as well, Steampunk Travel Journals- a small DIY zine which featured lists of Portland hot spots for shopping, kraken watching, maker spaces and places to get your gears lubed.

Along with the course materials, I developed a reading list of books within the genera from the Parasol Protectorate to HG Wells Time Machine.  Bringing further literacy discussion into the workshop I outlined the history of the movement and it's effects on art, film and pop culture.

Dia de los Muertos Makeup Tutorial

calavera hero
calavera hero

Counting the days until my favorite holiday Dia de los Muertos, and as a warm up to this year's celebration I've hosted a couple workshops in costume creation and sugar skull making.  I hate to leave my out of town friends and fans out of the fun- and at the compelling request of Crime Spree Carol, it seemed like I ought to post a quick tutorial on calavara creation.  I won't say that she threatened me into doing this, but now that the blog post is up, I'll assume she's destroyed all negatives of the incriminating 8' x 10' photos that arrived in last week's mail.

supplies
supplies

So Carol, and the rest of you, before we get to the disguise part, you'll want to  gather up supplies- The clown white grease paint was a purchase from Goodwill for $1.49, almost a steal!  I got the black and glitter liquid eyeliners, mascara and fake eyelashes from the drug store and black face paint and body art kit from the craft store.  In all the gear set me back about $30 but I'll be able to do a whole posse of folks with this so it was a good investment.  You might also want to get white face powder and tiny gems to add at the end for extra bling.

step1
step1

My friend Laura was kind enough to pose for the photos, I think Crime Spree Carol may have something on her as well, after this we'll consider all debts paid in full.  In the 1st step I covered Laura's face in the grease paint with a small sponge.  I left large areas around her eyes and tip of nose free.  If you'd like the makeup to set you can brush on the white face powder next, it will also help the other colors go on smoothly on the top.

step2
step2

Next, I applied face paint to the eye area, you could also use a dark eye shadow for this step but I liked having the ability to layer and add lots of color to the flower shapes.

step3
step3

In dark blue face paint I created a flower shape around Laura's eyes

step4
step4

I filled in the flower petals in a lighter blue and blended them into the green circles

step5
step5

Using the black liquid eyeliner I filled in Laura's nose and made the outlines for her mouth

step6
step6

I used the black eyeliner again to draw a spider web on her forehead and fill in her lips.  I also used it on her eyes in the waterline and outlined her upper eyelid

step7
step7

To give the web definition, I added a second line in black grease pencil.  This is a great tool to use when doing skeletons for guys especially in the cheek areas and to add lip effects.

step10
step10

For the last few steps, I traced around the flower eyes in black liquid liner and added glitter eyeliner highlights.  I also drew shapes on her cheeks and filled them in with face paint.  From here you could add false eyelashes and sequins or small gems as well

calavera flirts
calavera flirts

Top the whole thing off with a saucy headdress of flowers and don't forget the little people!

kidaveras
kidaveras

a Litany of Crimes

7997508691_972c253dc2_z

Oh man the Portland Mini Maker Faire at OMSI was so much fun, I'm only just beginning to recover, that and my bail money finally came through.  The number of cool things to see and do was astounding from indie computer games, 3-D printed toys, the 30 foot trebuchet, fractal designed copper furniture and chocolates you could shape yourself into exotic flowers. I spent a good portion of the weekend ducking arrows coming over the top of the Tracker's booth, thank goodness they'd replaced the steel tips with sponges!  Wire's Geek Dad blog has a great re-cap of the Faire  and Dale Dougherty founder of Make Magazine and Craft, and the brain child of Maker Faire gatherings was also in attendance, his blog post is here . Not to be left out of the making mayhem, I snuck into the OMSI parking lot and  and on the sly built my own stand,  offering "policing by proxy" inviting criminals and potential criminals the opportunity to confess their mis-deeds in a mock mug-shot-photo-booth.  I was shocked, shocked I tell you to see the number of young miscreants our city is manifesting, sure they may look cute now- but just wait until their feet can reach the gas pedal of the get-away car.

I've posted some of the more outstanding offenders here as well as a more complete listing on my flickr site I would advise using caution when approaching any of these individuals, clearly they are armed with a wicked sense of humor and several are confessed cereal killers and cookie thieves...

7997543096_794c8f0944_z
7997538569_d6046743bc_z
7997500561_11f3e4591e_z
7997559090_7468e6f3cc_z
7997507190_4b1b3c4952_z
7997554549_8bb71ec801_z
7997541940_df9dc95a74_z

PDX Mini Maker Faire

the man
the man

I barely have words to describe how incredibly cool day one was of the PDX Mini Maker Faire at OMSI.  I'll do a big fat link round up later, after I've had a little sleep and time to process all the great stuff I saw and new friends made.  The mug shot photo booth was a huge hit and I'll post pics up on flickr too as there were many, many amazing costume combinations and a wrap sheet of the world's greatest crimes-  Since I encouraged folks to come up with their own caption for the booking photos, there was a huge variety of crimes and misdemeanors, though I think today's favorite was "early morning toilet slammer" followed by the kid who's crime was being a hipster and yelled "that's so main-stream" when I took his photo.  There is one more day of amazing action if you can make it down here- remember code word is "you're the yarn bomb" for a free gift from me, and if you can't make it to my booth, there is lots of fun Criminal Craft handmade goodness in my Etsy shop.

Free Pussy Riot

pussyc
pussyc

Occasionally I get swept up in the heat of the moment, especially a moving political moment and feel my crafter self needs to take a stand. I'm so in awe of the fantastically brave punk rock chicks who"ve dared to take on Vladimir Putin the topless cowboy dictator.

How much I adore that the voices demanding democracy, freedom of speech and the separation of church and state happen to be hot 20 year old feminists in robber masks and Go-Go boots.

So today was set aside for busting out  freezer paper, hot iron and a whole mess of ink and glitter.  It's uncanny that this particular event should happen since I've pretty much always wanted a shirt that said "Free Pussy Riot".

I'm guessing that some of my other Criminal Crafter friends might want to make one too, so I'm posting my template, run with it, make something awesome, post the pictures on line and everywhere.

Nadezhda, Yekaterina, and Maria, you guys are inspiring, so sorry you got the short end of the stick in a corrupt system.

pussytemplate
pussytemplate

You're the Yarn Bomb

yarn blog post
yarn blog post

Because you are so cool, because you brave the weather to come out to book signings and liquor infused craft nights, because you wouldn't let me leave the house with my slip showing, purse that didn't match my shoes or a good alibi- I've made you a gift, and one for you, and you and you.  Fans of the Criminal Crafts blog who stop by my booth (#34) at Portland's Mini Maker Faire on Sept. 15th and 16th at OMSI and say "You're the Yarn Bomb" get this super cute kit- a small ball of yarn (enough to learn how to finger knit), instructions on finger knitting and a brief history on the art of yarn bombing, an atomic fireball candy and a commemorative gift bag hand stamped by Parole Officer Honeyman and myself. I'll also be giving a few of these precious gifts away at my panel discussion and Iron Craft event at the Contemporary Arts Center  on Monday Sept. 10th . Yes, I'm off to Cincinnati, you heard that right, the city that gave us Bootsy Collins, Carmen Electra, Doris Day and the Isley Brothers is also home to one of the more visionary and inspiring contemporary arts museums in the country.  I'm doing a fab night of talking and judging craft smackdown with local artists Pam Kravetz and Chris Salley and like any good hosts, they've promised beer will be available.  I'm really hoping to sneak off and squeeze in some yarn bombing when I'm there, since I hear it's quite the scene in Cincinnati.  There's even a yarn bomb posse, the BombShells  and they even have their own manifesto, and there really isn't anything I like more than crafters with manifestos, except for maybe crafters with beer.

On the off chance that you happen to live somewhere other than the craft meccas of Portland and Cincinnati, I'm thinking you deserve a treat too.  So the 1st five readers who email me a good alibi along with their address also get a gift in the mail.  So hop too it, and I want good alibis, something creative, slightly funny and will stand up in court.

Yarn bomb supplies
Yarn bomb supplies

So a bit more about these yarn bomb bags... they were generously donated by Stateline Bags and blanks in a number of sizes can be ordered from their website here.  They have a crafter's resource section on the website too which is pretty darn cool and it got me to thinking about some other projects I want to make later this fall.

For my bags I drew three designs on paper and made a rubbing transfer onto heavy linoleum stamp material.  I cut the shapes with carving tools but exacto knives work fine too.   From there it's as easy as stamping onto an ink pad and pressing onto the bag.  I did put a piece of cardboard in the bag so the image didn't seep all the way through.  I'm delighted with how the bags came out and am planning to screen print some others to using a darling print kit I got from Etsy seller SimpleKraft.

I've got a full stamp carving tutorial in the Criminal Crafts book and illustrations too, to make your own paper funeral.